Mostrando entradas con la etiqueta nailart. Mostrar todas las entradas

lunes, 9 de septiembre de 2013

31DC2013 Day 2: Orange Nails!

You thought I had forgotten about this again? Oh, heck no!! I actually did my nails on friday but had lots of things going and could only post this until now. Besides I wore my red nails for more days than I thought... And I'm sure I'll be having my yellow post tomorrow, which happens to meet the Suicide Awareness Day that has yellow as their support color and "Love" written on the wrist as a show of support too. I'm always happy to join a cause like that:)

So... anyways here are my orange nails for the second day opf the 31 Day Challenge 2013!


For this design I used Color Club Wham! Pow! and Color Club Best Dressed List.


I love the contrast between a nude color and a neon color, and also the simplicity of this mani. I only used striping tape over Best Dressed List to make de straight lines.


This was a simple design but I really liked the color combo, I realized I didn't have lots of oranges to pick from so I ended using  this neon shade.


I hope you liked this mani and I hope to see you very soon for the third day! :)


Love, Pam♥

lunes, 2 de septiembre de 2013

31DC2013 Day 1: Red Nails!

Hiiiii, beautiful criatures!! I'm sorry I posted this until now but, you know yesterday was Sunday Funday and I didn't get the chance to photograph my nails.
As soon as I saw it was Red Nails day I started thinking about what color would go with red and I decided to go with a glamorous gold accent.
With no more to say, here they are, my Red Nails:)


For this design I used China Glaze Cranberry Splash for my red base and China Glaze Swing Baby for the gold accents. I waited until my base color had dried and then with tape I did the V lines and painted over them with Swing Baby.


Featuring the little ring my brother gave me as a present that days "Te amo" which means "I love you". Aww isn't it lovely? Of course I had to include it! Lol.


I'm really enjoying this mani, it's so formal and holiday-esque, of course I'm using it for New Year's!! Haha, I hope you enjoyed this and I'm looking forward to show you my next designs for the 31DC2013!! :D
Btw, I'm not doing the challenge everyday, but every three or four days since I like to wear my mani for a little while:) So, I'll see you later this week!

Love, Pam♥

sábado, 31 de agosto de 2013

Sunset at the Beach!

Hello, there moonlight owls! How was your Saturday? I had a girls' day with my mom; went to the cinema, grabbed some dinner, overdose on Krispy Kreme's... You know, the usual.
This is my last post before the #31DC2013!!! I'm so excited!! Right now I'm just about to start doing my nails!:)

Well, today I've got the sunset, beach and birds on my nails, isn't that amazing!! This was my very first attempt to do a "sunset-like" design so yes, I did have my mistakes and byb mistakes I mean my cuticles look horrible! Seriously, I'm sorry:(


For this desing I *think* I used Orly White Tips, Revlon Impulsive, China Glaze Fifth Avenue, China Glaze Roguish Red, Finger Paints Art Nouv-Yellow and Finger Paints Black Expressionism.


First, I painted my nails with a coat of White Tips so the colors would pop, then using a make up sponge I sponged the gradient. To be honest I don't remember if I used Fifth Avenue or not, hmmm... Anyways, I think the effect was brilliant and then with my small brush I added the sand at the tip of my nails, then the palm trees on my thumb, index and ring and then some weird-shaped birds on my middle, pinky and (why not?) my thumb,


I really really liked this design, but if only I had cleaned up my cuticles it would have looked SO much better:( We all make mistakes and have to learn from them... :'( *sniff*
On the other side, this was very difficult for me and I was very proud with the final result.

I hope you liked this design and you can find forgiveness in your hearts for the awful state of my cuticles.
I'll see you tomorrow to start the 31 Day Challenge 2013 !! *squeals*

Love, Pam♥

viernes, 30 de agosto de 2013

Circus Dots!

Hi, there colorful butterflies!! Happy friday!! I hope you have lots of plans for this weekend, I only have a party for some friends that are leaving town, whom I'll miss LOTS:(

Well, today I've got this colorful circus-inspired nail art that made me think about clowns and zebras with mohawks on their heads ( kidding I don't like circus with animals): ). Anyways the color combo really felt like a circus on my hands and was very eye-catching and fun.


My base color is a very soft and rpetty pink (didn't have name, sorry), the blue is China Glaze For Audrey, the green is China Glaze Running in Circles, the red-ish orange is China Glaze Roguish Red and the yellow is Finger Paints Art Nouv-Yellow.


I simply painted my nails with two coats of my base color, let it dry and with my small and large dotting tool I places my dots in a upside down V shape... kinda.


One more pic just for the heck of it;)


I hope you liked this nail art, cause I sure enjoyed wearing it!! Haha, see you tomorrow with another nail art and getting ready for the 31 Day Challenge!!! *squeals* This will be fun! I'm already thinking my nail art!! :D
Have a great friday!! TGIF!;)

Love, Pam♥

jueves, 29 de agosto de 2013

In The Navy;)

Hello, pampered unicorns! Hope you're having a beautiful thursday, the highlight of my day was giving my dogs a bath but it was a pretty hilarious thing to do lol.
Anyways, today I've got another oldie that I loved while wearing it but since I'm  a perfectionist there were a few things I wanted to fix but whatever, I still liked it a lot.
Here's a navy-inspired mani I first saw on Pinterest, that's actually from Pshiiit according to the watermark but I couldn't find the link; I only saw it on Pinterest and adored it so I tried to do it and even though it wasn't the exact same replica I feel pleased with myself.


For this mani I used China Glaze With Love, Color Club Naughty-Cal Navy and Orly White Tips as well as my small dotting tool, small brush and striping tape.


For my thumb and middle finger I used two coats of White Tips, then I used my striping tape and went over them with one coat of Naughty-Cal Navy. It had its minor issues that I fixed with my small brush. Then for the anchor on my ring finger I freehanded the form and added details. Finally for my index and pinky I just painted with two coats of With Love and one coat of Naughty-Cal Navy and with my dotting tool simply added some polka dots.


I hope you liked this mani, I'm sorry about the cuticles but I'm no expert, I'm still learning:)
Thanks for reading! And I'll see tomorrow for another nail art.

Love, Pam♥

miércoles, 28 de agosto de 2013

I'm BAAAAACK!

Hey ya, lacquered puppies (puppies...?). I'm sooo glad to be back!! To be honest I was going through a phase, I was in finals, then on vacation and then I went through depression cause my nails were just not good enough for me and to make it worse my ring finger nail broke in a horrible way:( He's better now, and I'm back for good!:)
I decided to start the 31 Day Nail Art Challenge that Chalkboard Nails posted yesterday, but since it starts on monday I'll be posting old of my nail art pictures everyday (yes, everyday, I promise) while I get ready to bring it on these next 31 days!


Well, here's an oldie I did on April, I think and the funny thing is that nobody believed me I free handed the flowers! Everyone thought they were stickers and I was like, yeah, thank you, lol. Anyways I was real happy while wearing this mani and I got the original idea from the lovely Robin Moses except my base color was a bit more brown-ish or nude-ish than hers, here is her tutorial.


I used Color Club High Society as my base color and then using a dotting tool for the center of the flower. The white is Orly White Tips.


My nails are baby nails there! :3


There's no way I can explain how I did this without making it look all confunsing so I leave you Robin's video here (her art is 1000x more amazing and beautiful!).


Hope you liked this post and I promise I'll be back sooner rather than later;)


Love, Pam♥


lunes, 10 de junio de 2013

Colorblock ft. Dots!

Hello, lacquered unicorns! Happy monday to all of you! I know how mondays may suck but I'm on finals and I'm kinda sad I won't be having another ugly monday hating school:( Anyways, today I bring you this nail art based on Polish You Pretty's nail art tutorial. I looooved these colors together + the girls at PYP are always bringing up some very cool nail art! They were the first blog I ever saw when I started doing nail art, and by starting I mean putting three dots at the corner of my nail and even that would come out wrong!! Hahaha but practice makes perfect and I'm still learning but here it is.


I followed the tutorial, except I didn't use stripe tape and freehanded straight lines instead. The tools I used were scotch tape (for the division), a small dotting tool and a small nail art brush.


The colors I used were Finger Paints Black Expressionism, China Glaze Shower Together and China Glaze Surreal Appeal. I loved the way these last two colors worked together and how beautiful they looked. A combo I'll def use in the future!


Here's an indoors shot with natural lightning, so you can see it better.


The color changes a lot, huh? I hoped you liked this mani, and I'll see you soon pretty pretty unicorns!

Love, Pam♥

miércoles, 5 de junio de 2013

Even More Holo!

Heeeello, pretty unicorns! Happy thursday! Smells like weekend on this spring air:)
Today I brought you this nail art I made that looked simply amazing! It's simple but it's beautiful and and attention seeker! Wearing this a lot of people asked about my mani and how I did it, even how I did the holo (?)... Some people don't even know that holo polish exists hahaha. Anyways here it is, my simple but not very subtle holo mani!


I used Color Club Blue Heaven and FingerPaints Shades of Dark and my top coat was Orly Sec 'N Dry.


I painted my accent nail with FingerPaints Shades Of Dark and the other nails with Color Club Blue Heaven. When my accent nail was dry I made the pattern using striping tape and then painted over it with Color Club Blue Heaven, then I immediately took off the striping tape using some tweezers and finally I added my top coat!


Of course my camera couldn't quite capture the beauty in this holo but it was truly amazing, I'm just in love with Color Club holos!!
I hope you liked this easy and simple nail art, see you soon!:)

Love, Pam♥

martes, 28 de mayo de 2013

Blue Gradient + Glitter!

Good afternoon sexy unicorns!! How are you feeling today? I'm feeling kinda down, don't know why... And I said to myself "Hey girl! We should def post some old nail art today!" and I was like "Yeah! Great idea!" So here I am.
I made this some time ago and I think it was my very first complete gradient nail art (my first try was for Valentine's Day). Back then I was also so very excited about my new China Glaze acquisitions... Bling It On and Graffiti Glitter! So I decided to use one of them here. I had heard so many good things about that collection that as soon as it came out here I bought my favorites!!
Well, in the end this is how it ended up looking like:


I used Orly White Tips, China Glaze For Audrey and China Glaze Shower Together to make the gradient using a make-up sponge.


Then I added one coat of China Glaze Bling It On to make it look more interesting and complex. Bling It On is a black and blue glitter on a clear base and it's really amazing and beautiful!!
Btw, I'm soooooorry (once again) for the crappy quality but this is the best I could get. :( #CameraPhoneProblems:(


I hope you liked this, I'll see you soon beautiful creatures!:)

Love, Pam♥

domingo, 31 de marzo de 2013

Good Ol' Nail Art

I know I'm a mess for taking so long for this post, but I'm presenting exams for different universities right now so I've been kinda busy:(
But, finally here is some nail art! This is actually what I wore this Valentine's Day (seems like ages ago). I'm not very fond of Valentine's Day so I decided I wouldn't do the typical in your face Valentine's nail art. Instead I used pink and purple! :) Here it is!


I used Revlon Impulsive, China Glaze Fifth Avenue and Color Club Wildflower.
I made a stencil with tape to do the heart gradient and used my nail art brush to draw the tiny hearts. I also used a sponge to do the gradients.


I liked it because it was subtle and not too cheesy:) Hope you liked it, and sorry for the delay! I promise to be back soon!
Love, Pam♥

miércoles, 13 de febrero de 2013

Wannabe Leopard

Hey, guuuys!! :) How you doing? Happy wednesday, smells like a nice weekend! So, last week I went to a bar with some girl friends (it was a G.N.O.) and I wore a loose black blouse, nude pumps, and YES! Leopard print jeggings! And as the nail art  maniac I am, I decided to match my nails with my jeggings. BUT, I didn't have the exact nude for the background (I only have a greyish nude and a pink nude) so I went with Art Nouv-Yellow from Finger Paints. The result was a half giraffe half leopard animal. With the yellow background that I thought would be so much lighter, and the brown spots it was the perfect combo for a giraffe print, buuuut it had leopard spots instead... I still likes it a lot anyways, so here it is.


I used Finger Paints Art Nouv-Yellow, Finger Paints Black Expressionism and my dotting tool (sorry, but my brown polish has no label).


Sorry for the crappy photos:( It doesn't let me capture it correctly.


I did like it, and I actually wore for a loooong time, which in nail art world is five days. I've always loved doing leopard print nail art so maybe that's the reason why. I hope you liked it and I'll be back very soon. :)

Love, Pam♥

sábado, 9 de febrero de 2013

Water Marble!!

Hey guys!! Happy saturday!! Smells like a good weekend! I'm going to the Swedish House Mafia concert in Mexico City (!!!) I'm so excited about it! Anyways, I hope you all have a great weekend too!
Well, after so many (so so many) failed attempts to water marble, I finally made a mani! This is such a big success for me cause I've been trying to do it literally for half a year. I watch Water Marble Queen, Colette, and I swear I've followed all her steps and tips, but it was a complete mess for me.
Well, finally this worked out for me and I made a simple petals design (the easiest design in water marbling, I guess), but I was quite happy with it while wearing it:)


I used Color Club Catwalk Queen, Color Club Wildflower and China Glaze Fifth Avenue.


If I could change anything I'd change the length of my nails... But talking about the mani, I'd change a little bit the colors maybe... I would change Wildflower for a reddish pink, maybe...


I hope you liked my first water marbling success, I'm def trying this again soon with some other colors (I already have some combos to try).
Thanks for reading, lacquered loves. Have a nice day!

Love, Pam♥

martes, 5 de febrero de 2013

Nude & Polka Dots

Hello, guys!! I'm sorry I've been away for so long... I was at this school activity we have to do where you work for 2 weeks at a factory as a worker to see how hard it is to actually get some money. I had to go to a slippers factory!! It was awesome! I learned so many things and I got to know the people that worked there and they're all amazing people! I really enjoyed my time there! :)
Well, anyways... here's a nail art I made last week. It's not that awesome or anything, but here it is.


I used Color Club High Society and Orly White Tips. I used two coats of High Society and with a small dotting tool made some polka dots using White Tips.


Hope you liked it, and I promise to post regularly hahaha, I hope you all have an amazing week! See you soon:)

Love, Pam♥

miércoles, 2 de enero de 2013

New Year's Nail Art

Hello, gorgeous lacquered loves! I hope you're all having a great day and an excellent begin of the year!! Well, here I am presenting you the nail art I wore for NYE; I actually did this last friday and I didn't think it would survive to see NYE, but it did and I loved it.
It's simple but classy and the glitter is sooo holidays and sooo New Year!! lol, well here it is.


The colors I used are China Glaze Cranberry Splash, China Glaze Running in Circles, and China Glaze Glitter All The Way. It's an easy and simple tape manicure, but it looks so classy!


I'm not holding any bottle on these photos cause I wasn't home when I took them, but I tried my best not to make my hands look awkward. :)


I hope you liked it and you all have my best wishes for this new year:) 

Love, Pam♥

domingo, 9 de diciembre de 2012

Christmas Gradient

Heeello, loves! I'm here to present you a beautiful gradient using China Glaze Glitter All The Way and an accent nail fail.
So, I wanted to use China Glaze Cranberry Splash as my base color and I decided to do a glitter gradient with Glitter All The Way cause I hadn't use it. They both made a beautiful couple, they really should take things more seriously between them.
Then I don't know what I wanted to do but I just covered my accent nail with China Glaze Glistening Snow. M-i-s-t-a-k-e. It definetely ruined the gradient. I should have just do the gradient for all the nails. I think Glistening Snow felt jealous about the beautiful couple the others made and just ruined my happiness... Buuuut well, enough drama, here are the photos and I apologize in advance for the quality. :(


Now you know what I mean, huh? But seriously, the photos don't make justice of how beautiful the gradient looked, really a pair of beautiful colors. I'm happy I got them:)
And here's a picture of Glitter All The Way, it's actually pretty bad, so you shouldn't bother... :/


I told you it was bad. But I hope you didn't hate this post and hate me forever:( Right now I'm wearing China Glaze Pure Joy, and I think I'll post about it tomorrow:)
Thanks for reading.
Love, Pam♥

lunes, 3 de diciembre de 2012

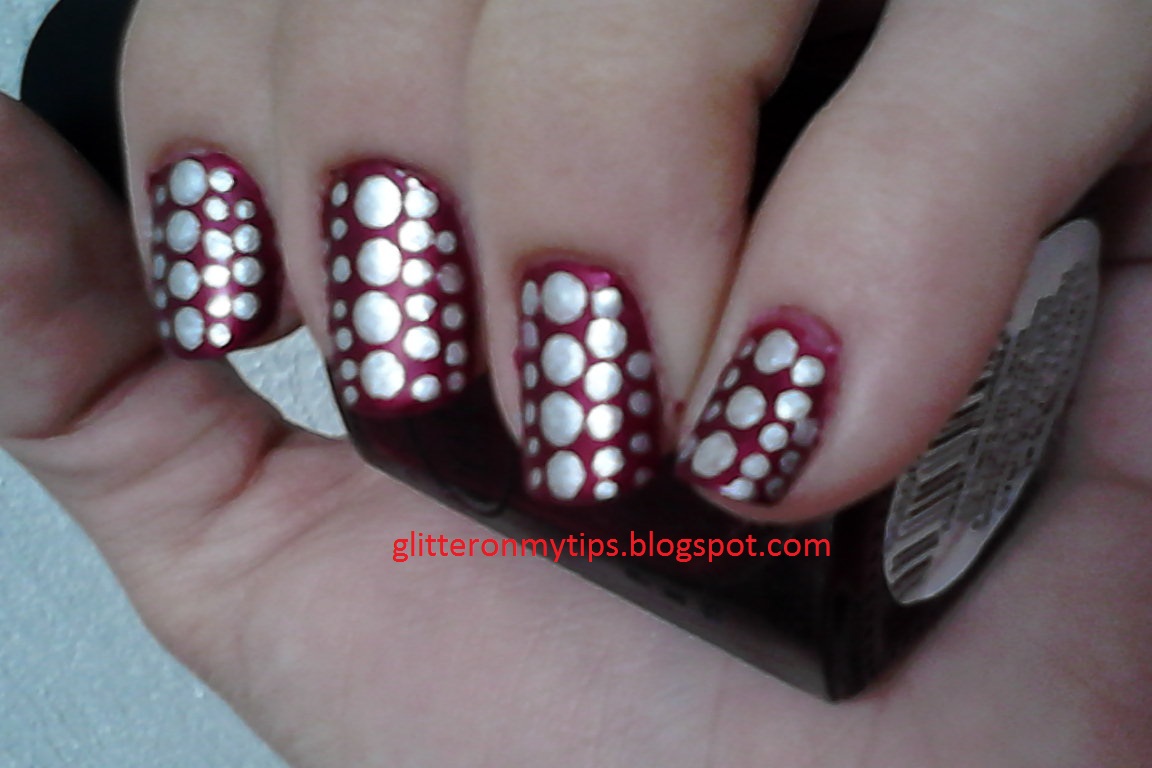
Velvet Red ft. Silver Dots

Hi, lacquered ladies! I know I said I would be posting two more nail arts last week but number one: time's just flying by lately, number two: finals are eating me alive!!! Seriously, and they enjoy it:( Aaaaand last, number three: my house's being painted so it's really been a pain in the butt.
But well, I did have this religious thing that turned out to be sooo tiring and (not because of the religious thing, but fo other reasons) turned out to be one of the worst nights of my live :( Sniff. But as I had to wear something for the day (night) so I decided to match it with my dress. I actually didn't have a dress until two hours before the event, but as soon as I bought it and took a look at my stash I knew I had the perfect color: Color Club Resort To Red. Oh.My.God. This color!!! It's just amazingly beautiful!!! And it matched perfectly my dress. But I couldn't wear it plain, so, since my dress was plain, I decided to add a few dots (I know, I'm a dot-addict) and I went for silver dots.
I decided to do a simple and quick nail art since I didn't have much time, but one that I adore. I first saw this on the Polish You Pretty blog here and I loved it!
And here's my attempt:


I used Color Club Resort To Red as my base color and Color Club What A Drag for the dots. I used a small and big dotting tool and when I was done I covered with one coat of  Color Club Matte-Ified.


I loved how this ended up looking and I loved how it looked with my dress. The only two good things about my night:')
I definetely enjoyed and I hope you liked it as much as I did, this week and until january I'll be doing christmas nail arts. My favorite time of the year! See you soon!

Love, Pam♥