Mostrando entradas con la etiqueta glitter. Mostrar todas las entradas

lunes, 30 de diciembre de 2013

31DC2013 Day 23: Inspired By A Movie

Heeeeey there glitter fellas! After a long holiday break I'm back! For this special occasion I chose a movie I just saw and I loved: Frozen.


I didn't really know how to represent Anna and Elsa, like I'm not very good at drawing faces so I went for the colors that symbolized them; and, of course, Olaf!


Elsa's hues are more icy and light blue shades and Anna's are warmer, and I just couldn't ignore that gorgeous royal blue/pink colorblock on her dress!
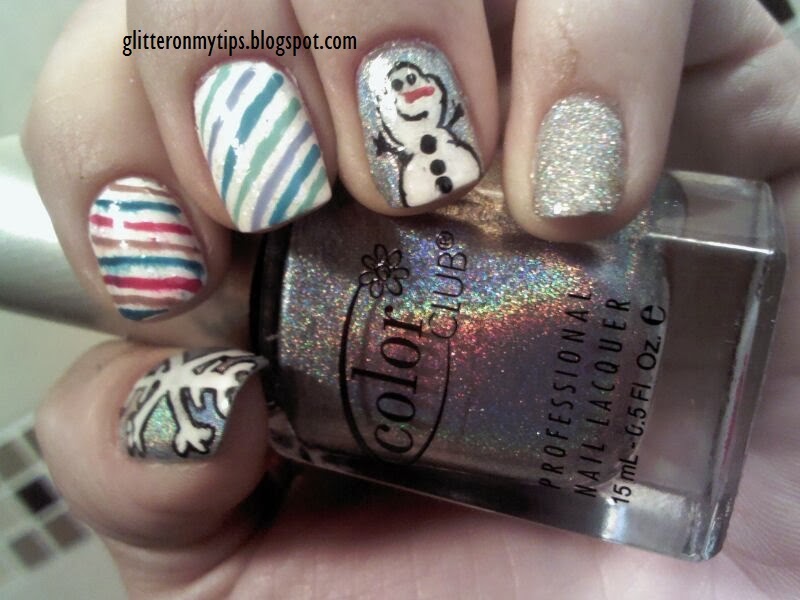

For my thumb and ring fingers I used Color Club Blue Heaven as my base color, then with acrylic paint I painted the snowflake and Olaf.
On my pinky I painted three coats of China Glaze Glitening Snow.


On my index and middle fingers I used China Glaze White On White as my base color then painted one coat of Color Club S'il Vous Plaît and finally with my striping brush I painted thin lines with Color Club Overboard, Color Club Best Dressed List and China Glaze Shower Together (index); and China Glaze For Audrey, Color Club Hydrangea Kiss and China Glaze Shower Together mixed with China Glaze White On White for a lighter shade of blue.


I'm sorry about not posting this week but I'm already doing my next nail art, so I'll see you sooner rather than later ;)
I hope you liked this Inspired By Frozen nail art, I know it's simple but I think it's cute. Btw, I'm sorry about my topcoat dragging the polish on my index:( Hate when that happens! Anyways, I'll see you soon! Happy Holidays and Happy New Year!! :D :D 

Love, Pam♥

jueves, 12 de diciembre de 2013

31DC2013 Day 20: Water Marble

Hello there glittery criatures of Planet Earth, it's almost Friday!!
Today is water marble day and I have to say I had an exhausting time with this one. I'm not very good at it and about a year ago I was obsessed with Colette's videos from My Simple Little Pleasures. I wasted a TON of nail polish, so for this particular challenge I decided to buy cheap ones from Wal-Mart since a friend had told me once they worked pretty good and they're only $10 pesos which is less than a dollar. I picked up a violet and green one and decided to give China Glaze Shower Together a go since I remember it worked and I hadn't used it in a while.
So yeah I did like eight attemps and only like six were the ones used for my both hands. It was all messy and took a long time but here it is.


Sooo technically the polishes I used are so cheap they didn't even had a name lol but the blue is China Glaze Shower Together and my white base is Nina French White.


Also, that beautiful glitter is Finger Paints Peacock Portrait. Look at those colors!! I saw it at Sally and couldn't help buying it instantly! Finger Paints has some really awesome glitters and this is definitely one of those.


Some more love to that glitter...


I liked the final result and was very happy to wear it. Also, Peacock Portrait is a glitter that will easily go to my most-used stash! The colors are so beautiful that I specifically tried to use the same colors and I'm telling you in person it looked pretty good.
Hope you enjoyed this and I'll see on my next post;) As I said before, the next part of the challenge it's all gonna be Inspired By Christmas... Song, Movie, Book, etc. I'm so looking forward to start it!

Love, Pam♥

lunes, 2 de diciembre de 2013

31DC2013 Day 17: Glitter!!

Heeey there glitter fellas! Happy monday! It's been more of a lazy monday for me so far and I actually hate lazy days, so I gotta stop procrastinating and do something today.
For this glitter day (!!!) I didn't know if I should choose loose glitter, a glitter polish or some glequins, soooo... I ended up going for one my ultimate favorite glitter polish and some glequins.


My white base is Nina French White and the holographic glitter I used for my accent nails is China Glaze Glistening Snow.


To apply the glequins I used my topcoat and something sharp to help me put them on. Then I used two coats of Nina Super Dry Topcoat to smooth the surface of my nails.


Glistening Snow is one of my favorites, if not my favorite, glitter polish because it's just so unique and the holographic power it has is really amazing! I just wished it could translate to the pictures...
I reaaally liked this color combo it felt like Christmas and snow was on my fingers!! And talking about the holidays I'm gonna change the rules a little bit and do the third part of the challenge (Inspired By) all about Christmas.
I hope you enjoyed this nail art, I'll write you later! Have an amazing week:)

Love, Pam♥

domingo, 3 de noviembre de 2013

31DC2013 Day 12: Stripes!

Well, hello there glittery puppeeeeehs! Happy Saturday! Today I've got my stripes design for you. I had already done a stripes design for orange day and I actually didn't mean to do a design that was intended for a different day but it just happened andI forgot I had a stripes day. Anyways, I really liked this and I also enjoyed it because  of the lovely glitter polish I used here! I feel like it's kind of a mermaid-y look which is awesome!


The colors I used were China Glaze For Audrey (my fave blue ever) as my base color and China Glaze Water You Waiting For.


I simply painted my nails with two coats of For Audrey let it dry completely and then placed 6-7 pieces of striping tape in diagonal. I made sure it was stuck and the edges didn't come up and painted two fine coats of Water You Waiting For and immediately removed the tape with the help of some tweezers.


My neighbor liked it so much she asked me to do her nails just like mine, lol.
I hope you enjoyed this manicure and like itas much as I liked wearing it and feeling like a small part of me was meant to be mermaid-ian. Have a nice safe Saturday! See you next week;)

Love, Pam♥

lunes, 28 de octubre de 2013

31DC2013 Day 10: Metallic Nails!

FINALLY! I have my metallic nails for you!! I actually ended up doing three different designs and I just wasn't too fond with the first two. I chose some holo polishes to show out the "metallic" look but didn't think like it shouted METALLIC out loud, so I went with foil and oh my goodness I have such a love/hate relationship with foil! The plastic edges always stick up and then I end up pulling it off and it doesn't last me more than 12 hours! But I wasn't just gonna give up with the foil, so I decided to simply apply the foil so part of it would transfer to the nail and it'd look like a vintage gold manicure, I guess... I also bought this gorgeous Color Club polish and had to use it!! It was pretty metallic, though;)


For this nail art I used one of my all time faves, Orly Close Your Eyes, as my base color and Color Club The Uptown for my ring and thumb.


I simply painted my nails with one coat of Close Your Eyes, let it dry and then applied my second coat and while it was still wet I dabbed my sheet of gold foil over my nails so part of the foil would pass to the nails.


This reminds me a bit of the gold leaf top coats (real gold) that came out about a year ago, and I really liked the idea of having that kind of look without expending $30 on a top coat!


I hope you liked this post and now I really have some more for you later this week! :)


Love, Pam♥

lunes, 14 de octubre de 2013

31DC2013 Day 9: Gradient Nails!

Hello, gorgeous creatures! Happy mondaaaay! First of all, I have to say I made a huuuuge mistake!! I skipped the Metallic Nails day and I really don't even know how! I'm making it and posting it next but omg I feel so bad! Poor metallic day:(
Anyways, today I have, as the title says, my gradient nails for day 9, but this is no usual gradient... This is a Halloween inspired gradient! Of course I had to use purples and oranges and then I decided to add a little spice with a glitter gradient! Most of the colors are from last year's China Glaze Halloween Wicked Collection.


The colors I used were China Glaze Roguish Red, Color Club Secret Agent, China Glaze Cast A Spell and China Glaze Glitter Goblin.


For my gradient I mixed both colors on a make up sponge and then sponged them on my nails, and for the glitter gradient I painted my accent nail with Cast A Spell, then painted the tip of my nail with Glitter Goblin and dragged the glitter towards my cuticle.


And here's a photo of the accent nail! Only because I really liked the combo, so Halloween-esque but not the typicall Halloween-esque you know what I mean? Yeah? No? :(


I do want to say that I got some bubbles that I saw after I had applied top coat :( But I still liked the end result so decided to leave it that way, so unprofessional right? I know, I'm sorry, don't judge me. :(
Well, I'll see you later with (finally) my forgotten metallic nails.

Love, Pam♥

jueves, 3 de octubre de 2013

31DC2013 Day 6: Violet Nails!

Hey, guys!! I'm so sorry I haven't post anything in almost two weeks but I didn't have my laptop with me so you know how that is... :(
Anyways, I still did the 31 Day Challenge, and I'm wearing my rainbow nails right now! I'm presenting to you my violet nails though, you know, so we can continue with the challenge as normal:)
For my violet nails I did something I had in my mind for a loooong time and I had just bought Hydrangea Kiss and thought it was the perfect violet/lilac. I guess I should've done this on the gradient day but I actually want to do a gradient nail art for that day and not a gradient manicure so I guess it's fine.


I did the ombré manicure technique using white polish and black polish. I added one and two drops of white polish for my index and thumb and then one and two drops of black for my ring and pinky.
I was surprised to see that the resulting color from mixing black was a taupe with violet hints but it looked pretty cool to me, plus I adore taupe.


The colors I used were Color Club Hyndrangea Kiss, Orly White Tips, Finger Paints Black Expressionism and the glitter is L.A. Colors Sparkling Diamonds


I hope you enjoyed this post! And I promise to be back tomorrow for the next 31 Day Challenge nails!! :)

Love, Pam♥

martes, 28 de mayo de 2013

Blue Gradient + Glitter!

Good afternoon sexy unicorns!! How are you feeling today? I'm feeling kinda down, don't know why... And I said to myself "Hey girl! We should def post some old nail art today!" and I was like "Yeah! Great idea!" So here I am.
I made this some time ago and I think it was my very first complete gradient nail art (my first try was for Valentine's Day). Back then I was also so very excited about my new China Glaze acquisitions... Bling It On and Graffiti Glitter! So I decided to use one of them here. I had heard so many good things about that collection that as soon as it came out here I bought my favorites!!
Well, in the end this is how it ended up looking like:


I used Orly White Tips, China Glaze For Audrey and China Glaze Shower Together to make the gradient using a make-up sponge.


Then I added one coat of China Glaze Bling It On to make it look more interesting and complex. Bling It On is a black and blue glitter on a clear base and it's really amazing and beautiful!!
Btw, I'm soooooorry (once again) for the crappy quality but this is the best I could get. :( #CameraPhoneProblems:(


I hope you liked this, I'll see you soon beautiful creatures!:)

Love, Pam♥

domingo, 13 de enero de 2013

Holiday Penguin!

Hello lacquered loves! How are you doing? I hope you're doing good, I'm sorry for being away for so long, but I'm working at a factory at the moment so I really don't have much time, and the only time I get is used for study purposes, so yeah my life is kinda boring and crappy right meow. But anyways, I have this nail art I wore after the new year's one, and now that I remember I wore it a week and a half ago and it seems ages to me. I haven't made any more nail arts cause I can get my nails broken at work so I've gotten them shorter and worn only hardener on them.:(
Well, here it is, my last holiday nail art: The amazing wannabe penguin!


I used China Glaze With Love, Color Club High Society, Finger Paints Art Nouv-Yellow, China Glaze Fifth Avenue, Orly White Tips and Finger Paints Black Expressionism for the penguin and for the other nails I used China Glaze Pizzazz (an awesome multicolor glitter) over Orly White Tips.


I followed this tutorial for the penguin, mine isn't so perfect but it's not that hard to do!! :)


I really liked this manicure even though the penguin might not look like a penguin in some angles...


I'm sorry for the long pause and I promise I'll upload non-stopping nail art next week. I've bought nail polishes that I haven't used yet:( so I really want to change that sad truth.
I hope you liked this mani, and I hope to see you next week!

Love, Pam♥

miércoles, 2 de enero de 2013

New Year's Nail Art

Hello, gorgeous lacquered loves! I hope you're all having a great day and an excellent begin of the year!! Well, here I am presenting you the nail art I wore for NYE; I actually did this last friday and I didn't think it would survive to see NYE, but it did and I loved it.
It's simple but classy and the glitter is sooo holidays and sooo New Year!! lol, well here it is.


The colors I used are China Glaze Cranberry Splash, China Glaze Running in Circles, and China Glaze Glitter All The Way. It's an easy and simple tape manicure, but it looks so classy!


I'm not holding any bottle on these photos cause I wasn't home when I took them, but I tried my best not to make my hands look awkward. :)


I hope you liked it and you all have my best wishes for this new year:) 

Love, Pam♥

domingo, 23 de diciembre de 2012

Late Christmas Post!

Hello there! I hope everyone's having a nice winter break cause I sure am:)
I'm sorry for the lack of posts but today (this early early morning) I'll have two, maybe three posts.
The very first one is just a simple manicure, no nail art, but it's an awesome nail polish that looks beautiful on  its own.


This is China Glaze Pure Joy and the name speaks the truth. It's a beautiful red and gold glitter that says "Merry Christmas and a Happy New Year" everytime you wear it.


Sorry for the blurry photos, and that my camera couldn't capture its beauty, but really, it's an amazing polish!!


Here's a shot of the bottle. This glitter ahs great coverage and looks amazing on its own, it's great for a simple but gorgeous holiday manicure:)

I hope you liked this polish as much as I did, and thanks for reading!:)

Love, Pam♥

domingo, 9 de diciembre de 2012

Christmas Gradient

Heeello, loves! I'm here to present you a beautiful gradient using China Glaze Glitter All The Way and an accent nail fail.
So, I wanted to use China Glaze Cranberry Splash as my base color and I decided to do a glitter gradient with Glitter All The Way cause I hadn't use it. They both made a beautiful couple, they really should take things more seriously between them.
Then I don't know what I wanted to do but I just covered my accent nail with China Glaze Glistening Snow. M-i-s-t-a-k-e. It definetely ruined the gradient. I should have just do the gradient for all the nails. I think Glistening Snow felt jealous about the beautiful couple the others made and just ruined my happiness... Buuuut well, enough drama, here are the photos and I apologize in advance for the quality. :(


Now you know what I mean, huh? But seriously, the photos don't make justice of how beautiful the gradient looked, really a pair of beautiful colors. I'm happy I got them:)
And here's a picture of Glitter All The Way, it's actually pretty bad, so you shouldn't bother... :/


I told you it was bad. But I hope you didn't hate this post and hate me forever:( Right now I'm wearing China Glaze Pure Joy, and I think I'll post about it tomorrow:)
Thanks for reading.
Love, Pam♥

jueves, 6 de diciembre de 2012

Glistening Snowman

Heeeello, world! Here I am posting almost at 1am, sorry. Well, this last 3 days I've worn this simple but cute christmas nail art. I really loved it.
I got more China Glaze Holiday Joy glitters and I decided I couldn't wait to use them, and here's the result.


I used China Glaze Glistening Snow, a gorgeous silver holo that got my love; and China Glaze Cranberry Splash. I'm definetely using Cranberry Splash on my next nail art, it's a beautiful shade of red! For the snowman I used Color Club French Tip, my basic white, China Glaze Roguish Red and Finger Paints Black Expressionism, my basic black. I f you noticed, I added a little glitter on my accent nail by using Color Club S'il Vous Plaît, I wanted it to look like snowish.
I had to re-do my left ring finger cause my top coat ruined my snonwman-.- But I felt like I had to. And if you're wondering how my right hand ended, here's a photo of it in the shade.


I loved loved loved this nail art, seriously, I loved wearing it. And btw, I did have a hard time placing those little black dots cause I have a terrible pulse... So it was a big achievement for me. :)
And here I leave you a photo of my Glistening Snow bottle. Pure beauty. No photo could ever recreate its beauty. Really.


Sorry about the ugly background but that was the only way it could get some sun from my room, it was a lazy day that day.
I hope you liked this Christmas nail art, and I'll be doing a lot more and more glitter. Thanks for reading and see you later!

Love, Pam.♥

miércoles, 28 de noviembre de 2012

Autumn Nail Art!

Hello, lacquered ladies!! Today I have an autumn nail art to show you, but first I gotta say I took the photos the very last day I wore it so it doesn't look perfect, but here it is.
Again, I'm really sorry for the quality.


So... I had no idea this was gonna look so autumn-ey, but it turned out just to be. I used China Glaze Cranberry Splash and Color Club Black-Ish for the colorblock and Finger Paints Fall Of Surprises! which is one of my favorite glitters of this year's collections. The black is Finger Paints Black Expressionism.


I used one coat of Color Club Black-Ish and let it dried then I simply painted half of my nail with China Glaze Cranberry Splash. After they both dried I marked the division with Finger Paints Black Expressionism and drew some small and fine lines. I covered my accent nail with Finger Paints Fall Of Surprises! and let all my nails dry, then used two coats of my top coat China Glaze Fast Forward.


I hope you liked it, it wasn't like wow to me but a lot of people really liked it so it was ok, plus I like the autumn-like plus it gave. I hope I can upload my neutral nail art this weekend, cause I'm planning to do my nails tomorrow. Thanks for reading, see you soon. :)

Love, Pam♥