Mostrando entradas con la etiqueta black expressionism. Mostrar todas las entradas

martes, 10 de diciembre de 2013

31DC2013 Day 19: Galaxies

Hi glittery puppies!! Happy Tuesday! Sorry for the late-night post. I hope everyone's starting off this week with the right foot. I know I am so far! I have a tiny story about this nail art today. It was the most annoying thing ever!!! Almost every post I read said it was SO easy, only some small sponging and that was it! Super easy! Even my dog could do it! Then I read Chalkboard Nails 'post about it not being that easy and I was afraid. If it wasn't that easy for her it would be hell hard for me! So I followed her steps and even some colors aaaaand it was a failure. Lol, my first try was a joke. Then I re-painted my nails and decided to try the sponging before applying again and until the third try on a sheet of paper I felt satisfied. Then it was ime of the magic, and honestly I felt pretty happy with it!


Colors used: Base - Finger Paints Black Expressionism; Sponging - China Glaze White On White, Color Club Rev'd Up, China Glaze Deviantly Daring, Finger Paints Art Nouv-Yellow; Glitters - Color Club S'il Vous Plaît, LA Colors Sparkling Diamonds.


To create this look I painted one coat of Black Expressionism on all my nails, then with a piece of a make up sponge and tweezers I gently, and I say veeeery gently, dabbed White On White. Next color was Rev'd Up and with a new piece of sponge I dabbed over White On White without covering it completely, then I used Deviantly Daring covering almost completely the white spaces left and finally I sponged a bit of Art Nouv-Yellow to add more texture. To simulate the stars I painted one very thin coat of S'il Vous Plaît, then I painted one thicker coat of Sparkling Diamonds, without it being too chunky.


It was nice to do something I've never done before and actually like the -second- result, I think it looks like a galaxy to me but I don't know what you'd think! Haha, hope you liked this design. I'll see you very soon for my next nail art.

Love, Pam♥

jueves, 5 de diciembre de 2013

31DC2013 Day 18: Half Moons

Heeeeey there glitter gals! How are you doing this wonderful week? I hope you're all enjoying the beginning of December and getting ready for Christmas and 2014. Who would have thought the year would pass by so damn quickly?!
Anywhatever, today is half moon day and I'm so happy for this next nail art. I actually went to a First Communion and it mached my outfit and the occasion so perfectly; it was meant to be. I'll be definitely be re-doing this manicure again, it's just so pretty and formal but not boring.


Colors I used were Finger Paints Black Expressionism, my fave nude: Color Club Best Dressed List, and China Glaze Swing Baby. Finally I topped everything with Color Club Matte-ified.


To create the half moon manicure I followed this super easy tutorial by Julie Ventura that has saved my life multiple times. It's so much better and easier than using reinforcement labels.
To add a little spice, with the help of my smallest dotting tool I made small dots following the half moon outline.


I absolutely LOVED this design! I was crazy about it! It's so subtle and formal yet so sophisticated and lovely. It's something I'd love to wear again.
I hope you like this nail art as much as I did. I'll see you soon with the next challenge!

Love, Pam♥

miércoles, 6 de noviembre de 2013

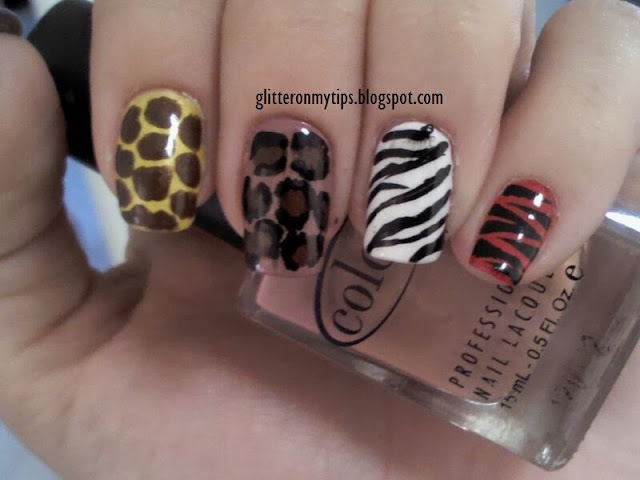
31DC2013 Day 13: Animal Print!

Heeeello, glittery puppeeeehs! Happy Hump Day! I feel like I always say this... Anyways today I got my animal print nail art to show you. I really loved this mani and I ended up wearing it for almost a week which is a lot for me lol. I didn't want to choose between ONE animal print cause I just couldn't pick a favorite so I decided to do them all! We've got a tiger-zebra-giraffe-leopard mix and match here!


My top coat bleeded and messed up with the leopard and zebra design, though it wasn't visible at hand distance nor in real life.
For these designs I used a big dotting tool, a striper nail art brush and a small nail art brush.


For the giraffe on my index I used Finger Paints Art Nouv-Yellow and L.A. Colors Chocolate Shimmer; to do the leopard on my middle finger I used Color Club Best Dressed List, Finger Paints Black Expressionism and again L.A. Colors Chocolate Shimmer; for the zebra on my ring finger design I used Orly White Tips and Finger Paints Black Expressionism; and finally for my tiger pinky I used China Glaze Roguish Red and Finger Paints Black Expressionism, again.


I realized during this mani that there's a severe lack of oranges and yellows in my nail polish collection... They're just not colors that I usually go for and everytime I intend to buy them I look at other colors or collections and end up buying somthing else hahah, I need to change that though!

And if you're wondering what's on my thumb it was Color Club Hydrangea Kiss paired with China Glaze Flock Together, it could be a bird-feather-print... hahaha
Anyways I hope you liked and enjoyed this as much as I did! I'll see you later this week.

Love, Pam♥

lunes, 7 de octubre de 2013

31DC2013 Day 7: Black & White

Happy monday everyone! Finally, here they are: my black and white nails!! When thinking about the desing I wanted to create with black and white polish the first thing that came to my mind was a chessboard so I went right to it without hesitation! This was my first ever checkered nail art and even though it isn't as perfect as I'd like it to be I'm quite happy with the result :)


I used Orly White Tips as my base color and then with the help of a small dotting tool I placed tiny dots to creat the "corners" of the squares, finally with a small nail art brush and Finger Paints Black Expressionism I freehanded the lines and filled the squares to create the pattern.


The only really bad thing was that my top coat (Sally Hansen Insta-Dri) dragged the black polish and makes it look quite messy :( I'm really sad about that part because until that I was pretty happy with the result. Sigh, well sometimes you win and sometimes you lose...


I really hope you can forgive that imstake of mine, cause I still don't :'( Haha, well I hope to see you very soon this week for the next 31 Day Challenge design!

Love, Pam♥

jueves, 3 de octubre de 2013

31DC2013 Day 6: Violet Nails!

Hey, guys!! I'm so sorry I haven't post anything in almost two weeks but I didn't have my laptop with me so you know how that is... :(
Anyways, I still did the 31 Day Challenge, and I'm wearing my rainbow nails right now! I'm presenting to you my violet nails though, you know, so we can continue with the challenge as normal:)
For my violet nails I did something I had in my mind for a loooong time and I had just bought Hydrangea Kiss and thought it was the perfect violet/lilac. I guess I should've done this on the gradient day but I actually want to do a gradient nail art for that day and not a gradient manicure so I guess it's fine.


I did the ombré manicure technique using white polish and black polish. I added one and two drops of white polish for my index and thumb and then one and two drops of black for my ring and pinky.
I was surprised to see that the resulting color from mixing black was a taupe with violet hints but it looked pretty cool to me, plus I adore taupe.


The colors I used were Color Club Hyndrangea Kiss, Orly White Tips, Finger Paints Black Expressionism and the glitter is L.A. Colors Sparkling Diamonds


I hope you enjoyed this post! And I promise to be back tomorrow for the next 31 Day Challenge nails!! :)

Love, Pam♥

sábado, 31 de agosto de 2013

Sunset at the Beach!

Hello, there moonlight owls! How was your Saturday? I had a girls' day with my mom; went to the cinema, grabbed some dinner, overdose on Krispy Kreme's... You know, the usual.
This is my last post before the #31DC2013!!! I'm so excited!! Right now I'm just about to start doing my nails!:)

Well, today I've got the sunset, beach and birds on my nails, isn't that amazing!! This was my very first attempt to do a "sunset-like" design so yes, I did have my mistakes and byb mistakes I mean my cuticles look horrible! Seriously, I'm sorry:(


For this desing I *think* I used Orly White Tips, Revlon Impulsive, China Glaze Fifth Avenue, China Glaze Roguish Red, Finger Paints Art Nouv-Yellow and Finger Paints Black Expressionism.


First, I painted my nails with a coat of White Tips so the colors would pop, then using a make up sponge I sponged the gradient. To be honest I don't remember if I used Fifth Avenue or not, hmmm... Anyways, I think the effect was brilliant and then with my small brush I added the sand at the tip of my nails, then the palm trees on my thumb, index and ring and then some weird-shaped birds on my middle, pinky and (why not?) my thumb,


I really really liked this design, but if only I had cleaned up my cuticles it would have looked SO much better:( We all make mistakes and have to learn from them... :'( *sniff*
On the other side, this was very difficult for me and I was very proud with the final result.

I hope you liked this design and you can find forgiveness in your hearts for the awful state of my cuticles.
I'll see you tomorrow to start the 31 Day Challenge 2013 !! *squeals*

Love, Pam♥

miércoles, 13 de febrero de 2013

Wannabe Leopard

Hey, guuuys!! :) How you doing? Happy wednesday, smells like a nice weekend! So, last week I went to a bar with some girl friends (it was a G.N.O.) and I wore a loose black blouse, nude pumps, and YES! Leopard print jeggings! And as the nail art  maniac I am, I decided to match my nails with my jeggings. BUT, I didn't have the exact nude for the background (I only have a greyish nude and a pink nude) so I went with Art Nouv-Yellow from Finger Paints. The result was a half giraffe half leopard animal. With the yellow background that I thought would be so much lighter, and the brown spots it was the perfect combo for a giraffe print, buuuut it had leopard spots instead... I still likes it a lot anyways, so here it is.


I used Finger Paints Art Nouv-Yellow, Finger Paints Black Expressionism and my dotting tool (sorry, but my brown polish has no label).


Sorry for the crappy photos:( It doesn't let me capture it correctly.


I did like it, and I actually wore for a loooong time, which in nail art world is five days. I've always loved doing leopard print nail art so maybe that's the reason why. I hope you liked it and I'll be back very soon. :)

Love, Pam♥

martes, 1 de enero de 2013

So Christmas-y!

Yaaaaayy! My second post of 2013!! I'm sorry for taking so long posting this one, but this was last week's mani. It was a pistol glitter accent (gorgeous) some dots, a fair isle snowflake, and, of course, Santa!! With nothing more to say, I present you the most christmas-y nail art I've ever done.


I used China Glaze Pure Joy for the pistol glitter accent, China Glaze With Love as my red base, Finger Paints Black Expressionism for the eyes, and Orly White Tips. I was feeling a little like experimenting so I mixed White Tips with Color Club High Society to get Santa's skin tone and I mixed With Love with White Tips too, to get Santa's nose.


I'm really really sorry about the quality of the photos :( I couldn't get any better ones. And the saddest thing was that even though I liked this nail art, it wasn't that perfect to me so I just wore it for a day and some hours:( 
Well, I hope you liked it better than me, and I'll see you tomorrow for another post. I promise, lol.

Love, Pam♥

Snowflakes and Polar Bears!

Happy New Year, everyone!!!! I hope you had a great NYE and I hope you celebrated it with the ones you love. I had a nice time with my family:)
Well, I know I took like forever because this was the mani I wore for christmas but here it is, finally!
I was really proud of this mani and I really loved it, so I hope you like it as much as I did, I have to say I had to re-do it so it could come out perfectly, but it was worth it!


I used China Glaze For Audrey, Orly White Tips, China Glaze Roguish Red, Color Club High Society and Finger Paints Black Expressionism; along with my nail art brush and my large and small dotting tools.


Here is a close up of the little polar bear that I fell in love with♥


So, actually it wasn't like a very very hard nail art but it's a really cute and pretty one. The thing that took me the longest were the snowflakes because I'm a perfectionist, I'm afraid. But here it is, the nail art I wore for Christmas! I hope you liked it!:)

Love, Pam♥

domingo, 23 de diciembre de 2012

Rudolph Christmas Nail Art


Hi there again! So, here's what I wore last week:) It was a very Christmas-y nail art with Rudolph! Very simple but veeery cute, I absolutely adored it!


I used for this nail art, China Glaze Cranberry Splash, Color Club French Tip, Finger Paints Black Expressionism, Color Club High Society, China Glaze With Love and I don't really remember the brown one, sorry:/


I'm wearing Cranberry Splash for all my nails except my accent nail. For the accent nail I went with a basic chocolate brown and with a large and small dotting tool I made the eyes and the nose using With Love, French Tip and Black Expressionism. For the little horns I used High Society and my small dotting tool.


I really liked how this turned out, and I hope you liked it as much as I did. As always thanks for reading!:)

Love, Pam♥