miércoles, 30 de octubre de 2013

31DC2013 Day 11: Polka Dots + Going Pink for BCA!

Hello, gliterry puppies!! Happy hump day! Since October has come to an end (almost), and since it's Breast Cancer Awareness month I decided to dedicate this design to the cause. Did you know every 2 minutes, there is a new breast cancer diagnosis? And every 14 minutes a life is lost to the disease? 1 in 8 women will be diagnosed with breast cancer and 85% of those diagnosis don't have any family history. It also affects men; of the more than 40,000 (forty THOUSAND) deaths for breast cancer, 400 are men.
This is no joke, and I think every women (and men) must do a self-exam and have a mammogram done twice a year. Let's help minimize breast cancer diagnosis and spread the word! Not only this month but all year long!


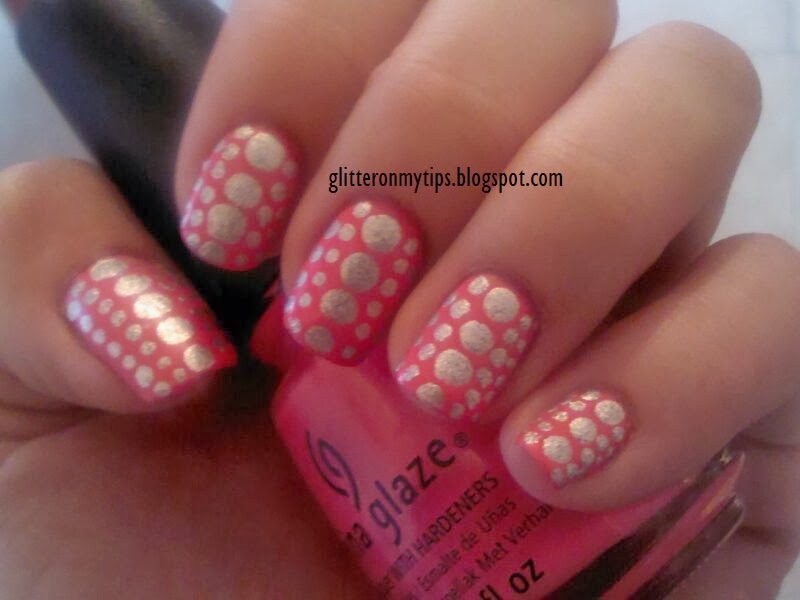
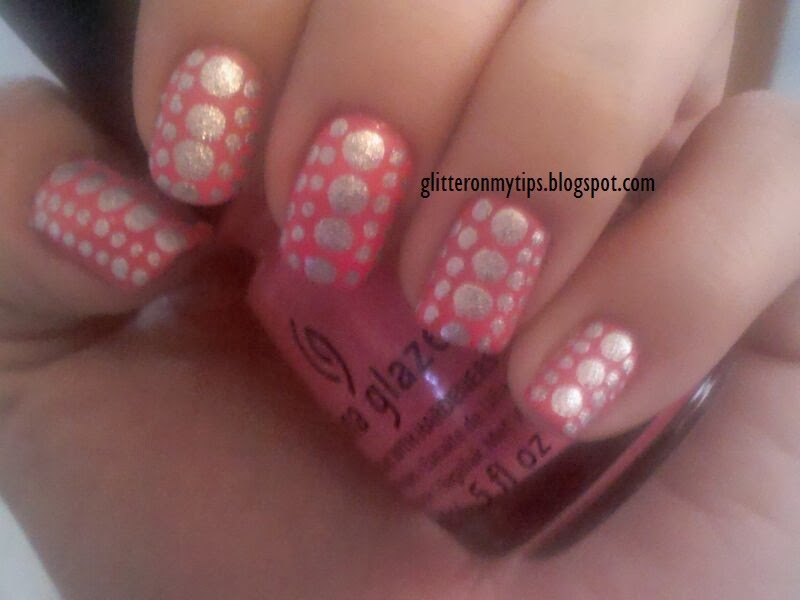
The colors I used were China Glaze Surreal Appeal and Color Club What A Drag.


I painted my nails with two coats of Surreal Appeal (I can never get enough of this pink!) and then used my large dotting tool to make some big dots along the mid section of my nails, then using a small dotting tool I made more rows of smaller dots on both sides of the first round of dots. Finally I topped it all with my matte top coat, I used Color Club Matte-Ified.


I hope you liked this post and I'd also love if you spread the word about this topic that has reached some of us very closely. Take care of yourself and take care of others.

Love, Pam♥

lunes, 28 de octubre de 2013

31DC2013 Day 10: Metallic Nails!

FINALLY! I have my metallic nails for you!! I actually ended up doing three different designs and I just wasn't too fond with the first two. I chose some holo polishes to show out the "metallic" look but didn't think like it shouted METALLIC out loud, so I went with foil and oh my goodness I have such a love/hate relationship with foil! The plastic edges always stick up and then I end up pulling it off and it doesn't last me more than 12 hours! But I wasn't just gonna give up with the foil, so I decided to simply apply the foil so part of it would transfer to the nail and it'd look like a vintage gold manicure, I guess... I also bought this gorgeous Color Club polish and had to use it!! It was pretty metallic, though;)


For this nail art I used one of my all time faves, Orly Close Your Eyes, as my base color and Color Club The Uptown for my ring and thumb.


I simply painted my nails with one coat of Close Your Eyes, let it dry and then applied my second coat and while it was still wet I dabbed my sheet of gold foil over my nails so part of the foil would pass to the nails.


This reminds me a bit of the gold leaf top coats (real gold) that came out about a year ago, and I really liked the idea of having that kind of look without expending $30 on a top coat!


I hope you liked this post and now I really have some more for you later this week! :)


Love, Pam♥

lunes, 14 de octubre de 2013

31DC2013 Day 9: Gradient Nails!

Hello, gorgeous creatures! Happy mondaaaay! First of all, I have to say I made a huuuuge mistake!! I skipped the Metallic Nails day and I really don't even know how! I'm making it and posting it next but omg I feel so bad! Poor metallic day:(
Anyways, today I have, as the title says, my gradient nails for day 9, but this is no usual gradient... This is a Halloween inspired gradient! Of course I had to use purples and oranges and then I decided to add a little spice with a glitter gradient! Most of the colors are from last year's China Glaze Halloween Wicked Collection.


The colors I used were China Glaze Roguish Red, Color Club Secret Agent, China Glaze Cast A Spell and China Glaze Glitter Goblin.


For my gradient I mixed both colors on a make up sponge and then sponged them on my nails, and for the glitter gradient I painted my accent nail with Cast A Spell, then painted the tip of my nail with Glitter Goblin and dragged the glitter towards my cuticle.


And here's a photo of the accent nail! Only because I really liked the combo, so Halloween-esque but not the typicall Halloween-esque you know what I mean? Yeah? No? :(


I do want to say that I got some bubbles that I saw after I had applied top coat :( But I still liked the end result so decided to leave it that way, so unprofessional right? I know, I'm sorry, don't judge me. :(
Well, I'll see you later with (finally) my forgotten metallic nails.

Love, Pam♥

miércoles, 9 de octubre de 2013

31DC2013 Day 8: Rainbow Nails!

Hey there, pretty baby tigers! Roaaaar! Happy hump day! I hipe everyone's having a great week so far:)
For today's challenge I wanted to try something I've never tried before and that was the dry marble! It is a bit of a mess but I liked the psychedelic effect it gave to my nails from hand distance.
This is something I'll be definitely trying again! I think that if you practice and get good at it you can make great designs.


I started with a white base color, then when it was completely dry I dabbed vertically all the colors in order on my nail and while it was still wet I used my smallest dotting tool to drag the polish from one side.


The colors I used were Orly White Tips, China Glaze With Love, China Glaze Roguish Red, Finger Paints Art Nouv-Yellow, a green neon from a spanish brand called Olé that has no name, China Glaze Shower Together, and Finger Paints Lavender Highlight.


I hope you liked this hot mess of a nail art, I hope next time I try this dry marble design I get a much better result. See you soon for the next challenge on the 31 Day Challenge 2013!

Love, Pam♥

lunes, 7 de octubre de 2013

31DC2013 Day 7: Black & White

Happy monday everyone! Finally, here they are: my black and white nails!! When thinking about the desing I wanted to create with black and white polish the first thing that came to my mind was a chessboard so I went right to it without hesitation! This was my first ever checkered nail art and even though it isn't as perfect as I'd like it to be I'm quite happy with the result :)


I used Orly White Tips as my base color and then with the help of a small dotting tool I placed tiny dots to creat the "corners" of the squares, finally with a small nail art brush and Finger Paints Black Expressionism I freehanded the lines and filled the squares to create the pattern.


The only really bad thing was that my top coat (Sally Hansen Insta-Dri) dragged the black polish and makes it look quite messy :( I'm really sad about that part because until that I was pretty happy with the result. Sigh, well sometimes you win and sometimes you lose...


I really hope you can forgive that imstake of mine, cause I still don't :'( Haha, well I hope to see you very soon this week for the next 31 Day Challenge design!

Love, Pam♥

jueves, 3 de octubre de 2013

31DC2013 Day 6: Violet Nails!

Hey, guys!! I'm so sorry I haven't post anything in almost two weeks but I didn't have my laptop with me so you know how that is... :(
Anyways, I still did the 31 Day Challenge, and I'm wearing my rainbow nails right now! I'm presenting to you my violet nails though, you know, so we can continue with the challenge as normal:)
For my violet nails I did something I had in my mind for a loooong time and I had just bought Hydrangea Kiss and thought it was the perfect violet/lilac. I guess I should've done this on the gradient day but I actually want to do a gradient nail art for that day and not a gradient manicure so I guess it's fine.


I did the ombré manicure technique using white polish and black polish. I added one and two drops of white polish for my index and thumb and then one and two drops of black for my ring and pinky.
I was surprised to see that the resulting color from mixing black was a taupe with violet hints but it looked pretty cool to me, plus I adore taupe.


The colors I used were Color Club Hyndrangea Kiss, Orly White Tips, Finger Paints Black Expressionism and the glitter is L.A. Colors Sparkling Diamonds


I hope you enjoyed this post! And I promise to be back tomorrow for the next 31 Day Challenge nails!! :)

Love, Pam♥