lunes, 30 de diciembre de 2013

31DC2013 Day 23: Inspired By A Movie

Heeeeey there glitter fellas! After a long holiday break I'm back! For this special occasion I chose a movie I just saw and I loved: Frozen.


I didn't really know how to represent Anna and Elsa, like I'm not very good at drawing faces so I went for the colors that symbolized them; and, of course, Olaf!


Elsa's hues are more icy and light blue shades and Anna's are warmer, and I just couldn't ignore that gorgeous royal blue/pink colorblock on her dress!


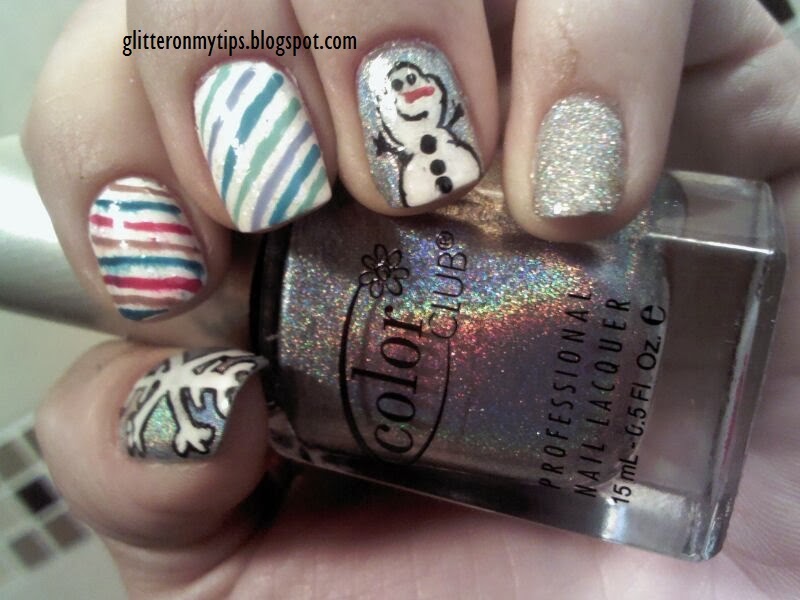
For my thumb and ring fingers I used Color Club Blue Heaven as my base color, then with acrylic paint I painted the snowflake and Olaf.
On my pinky I painted three coats of China Glaze Glitening Snow.


On my index and middle fingers I used China Glaze White On White as my base color then painted one coat of Color Club S'il Vous Plaît and finally with my striping brush I painted thin lines with Color Club Overboard, Color Club Best Dressed List and China Glaze Shower Together (index); and China Glaze For Audrey, Color Club Hydrangea Kiss and China Glaze Shower Together mixed with China Glaze White On White for a lighter shade of blue.


I'm sorry about not posting this week but I'm already doing my next nail art, so I'll see you sooner rather than later ;)
I hope you liked this Inspired By Frozen nail art, I know it's simple but I think it's cute. Btw, I'm sorry about my topcoat dragging the polish on my index:( Hate when that happens! Anyways, I'll see you soon! Happy Holidays and Happy New Year!! :D :D 

Love, Pam♥

lunes, 23 de diciembre de 2013

31DC2013 Day 22: Inspired By A Song!

Hi there glitter creatures of the world! Happy Monday!! Today for "Inspired By A Song" I chose one of my fave Christmas songs of all times: Frosty The Snowman!


I really like this song because its ending makes you go "Aww" without being sad, if that makes sense...
Anyways, ALSO I just started working with acrylic paints (black and white) and oh my goodness it's so much easier!!! I can't believe it took me this long to buy them! So I took the time and made this freehand nail art much more  detailed. And it only took me around half hour.


The blue base is China Glaze For Audrey and the white one is China Glaze White On White, the glitter is Orly Tiara, and the colors I used for the details include China Glaze Cranberry Splash, Color Club Wham! Pow! and China Glaze Water You Waiting For. As I said the white and black details are acrylic paint.


The thumb is the pipe Frosty has, the index is Frosty (obviously) and the ring is Frosty melting down.


A little love for the pipe...


I reaaaally enjoyed this nail art, it wasn't hard and I think acrylic paints really made the difference. I loved how it turned out and I hope you like it as much as I did!

Merry Christmas to everyone! I hope everyone's wishes come true and you all get to spend it with your beloved ones. ♥

Love, Pam♥

viernes, 20 de diciembre de 2013

31DC2013 Day 21: Inspired By A Color

Heeeeey there glitter loves! How's it going? It's been a whole long week, huh? I'm just posting this now because sadly my index nail broke terribly!! And it hurt even more! This happened last Saturday and until this Wednesday my nail stopped hurting, I cut my other nails (The Nailasaurus style) so they would match and I painted them, so yeah I'm sorry I'm just posting this now.
Alright, now after my sad sad story here's my "Inspired By A Color" nail art. This goes for coloooor RED. But like in festive, holiday-esque, Christmas-y red. I was inspired by Cranberry Splash from last year's China Glaze Holiday Joy Collection, which is a red I love to wear by itself of with nail art or on my toes.


The red is China Glaze Cranberry Splash, the green is Color Club Rule Breaker and the white is China Glaze White On White.


For the thumb, middle and ring fingers I used my striper brush and my next thinnest brush. First I created the thin red lines then the wider ones with two stokes of my thin brush, then I painted the green line above them with my striper brush.
For my index and pinky I used my thin brush and did a "star" design then at the edge of every line I added some V shaped details; finally I added some tiny dots with my brush.


I really loved this design. I think it's a perfect Christmas design and it's not so in-your-face-holiday. I also really liked rocking them on my tiny nails, it was the only thing that made me feel better about my shorties :c
I hope you liked it and I'm gonna be sooner than you think for another Inspired By/Christmas nail art.

Ps.: Am I the only one that this Inspired By A Color sounds a lot like Sesame Street's "Today was brought to you by coloooor RED and letter R!" lol


Love, Pam♥

jueves, 12 de diciembre de 2013

31DC2013 Day 20: Water Marble

Hello there glittery criatures of Planet Earth, it's almost Friday!!
Today is water marble day and I have to say I had an exhausting time with this one. I'm not very good at it and about a year ago I was obsessed with Colette's videos from My Simple Little Pleasures. I wasted a TON of nail polish, so for this particular challenge I decided to buy cheap ones from Wal-Mart since a friend had told me once they worked pretty good and they're only $10 pesos which is less than a dollar. I picked up a violet and green one and decided to give China Glaze Shower Together a go since I remember it worked and I hadn't used it in a while.
So yeah I did like eight attemps and only like six were the ones used for my both hands. It was all messy and took a long time but here it is.


Sooo technically the polishes I used are so cheap they didn't even had a name lol but the blue is China Glaze Shower Together and my white base is Nina French White.


Also, that beautiful glitter is Finger Paints Peacock Portrait. Look at those colors!! I saw it at Sally and couldn't help buying it instantly! Finger Paints has some really awesome glitters and this is definitely one of those.


Some more love to that glitter...


I liked the final result and was very happy to wear it. Also, Peacock Portrait is a glitter that will easily go to my most-used stash! The colors are so beautiful that I specifically tried to use the same colors and I'm telling you in person it looked pretty good.
Hope you enjoyed this and I'll see on my next post;) As I said before, the next part of the challenge it's all gonna be Inspired By Christmas... Song, Movie, Book, etc. I'm so looking forward to start it!

Love, Pam♥

martes, 10 de diciembre de 2013

31DC2013 Day 19: Galaxies

Hi glittery puppies!! Happy Tuesday! Sorry for the late-night post. I hope everyone's starting off this week with the right foot. I know I am so far! I have a tiny story about this nail art today. It was the most annoying thing ever!!! Almost every post I read said it was SO easy, only some small sponging and that was it! Super easy! Even my dog could do it! Then I read Chalkboard Nails 'post about it not being that easy and I was afraid. If it wasn't that easy for her it would be hell hard for me! So I followed her steps and even some colors aaaaand it was a failure. Lol, my first try was a joke. Then I re-painted my nails and decided to try the sponging before applying again and until the third try on a sheet of paper I felt satisfied. Then it was ime of the magic, and honestly I felt pretty happy with it!


Colors used: Base - Finger Paints Black Expressionism; Sponging - China Glaze White On White, Color Club Rev'd Up, China Glaze Deviantly Daring, Finger Paints Art Nouv-Yellow; Glitters - Color Club S'il Vous Plaît, LA Colors Sparkling Diamonds.


To create this look I painted one coat of Black Expressionism on all my nails, then with a piece of a make up sponge and tweezers I gently, and I say veeeery gently, dabbed White On White. Next color was Rev'd Up and with a new piece of sponge I dabbed over White On White without covering it completely, then I used Deviantly Daring covering almost completely the white spaces left and finally I sponged a bit of Art Nouv-Yellow to add more texture. To simulate the stars I painted one very thin coat of S'il Vous Plaît, then I painted one thicker coat of Sparkling Diamonds, without it being too chunky.


It was nice to do something I've never done before and actually like the -second- result, I think it looks like a galaxy to me but I don't know what you'd think! Haha, hope you liked this design. I'll see you very soon for my next nail art.

Love, Pam♥

jueves, 5 de diciembre de 2013

31DC2013 Day 18: Half Moons

Heeeeey there glitter gals! How are you doing this wonderful week? I hope you're all enjoying the beginning of December and getting ready for Christmas and 2014. Who would have thought the year would pass by so damn quickly?!
Anywhatever, today is half moon day and I'm so happy for this next nail art. I actually went to a First Communion and it mached my outfit and the occasion so perfectly; it was meant to be. I'll be definitely be re-doing this manicure again, it's just so pretty and formal but not boring.


Colors I used were Finger Paints Black Expressionism, my fave nude: Color Club Best Dressed List, and China Glaze Swing Baby. Finally I topped everything with Color Club Matte-ified.


To create the half moon manicure I followed this super easy tutorial by Julie Ventura that has saved my life multiple times. It's so much better and easier than using reinforcement labels.
To add a little spice, with the help of my smallest dotting tool I made small dots following the half moon outline.


I absolutely LOVED this design! I was crazy about it! It's so subtle and formal yet so sophisticated and lovely. It's something I'd love to wear again.
I hope you like this nail art as much as I did. I'll see you soon with the next challenge!

Love, Pam♥

lunes, 2 de diciembre de 2013

31DC2013 Day 17: Glitter!!

Heeey there glitter fellas! Happy monday! It's been more of a lazy monday for me so far and I actually hate lazy days, so I gotta stop procrastinating and do something today.
For this glitter day (!!!) I didn't know if I should choose loose glitter, a glitter polish or some glequins, soooo... I ended up going for one my ultimate favorite glitter polish and some glequins.


My white base is Nina French White and the holographic glitter I used for my accent nails is China Glaze Glistening Snow.


To apply the glequins I used my topcoat and something sharp to help me put them on. Then I used two coats of Nina Super Dry Topcoat to smooth the surface of my nails.


Glistening Snow is one of my favorites, if not my favorite, glitter polish because it's just so unique and the holographic power it has is really amazing! I just wished it could translate to the pictures...
I reaaally liked this color combo it felt like Christmas and snow was on my fingers!! And talking about the holidays I'm gonna change the rules a little bit and do the third part of the challenge (Inspired By) all about Christmas.
I hope you enjoyed this nail art, I'll write you later! Have an amazing week:)

Love, Pam♥